

Talo Guide
Installation and first launch
How to install Talo on your Mac, open it for the first time, and connect Claude Code or Codex.
This guide describes the private beta for Mac with Apple Silicon (M1 or later). There is no version for Mac with Intel: the installer contains only arm64 code and does not start on any Intel Mac, in any macOS version. To check what chip your Mac has: → About This Mac; if "Chip" says Intel, this beta is not for your machine.
Download only the candidate indicated by the team testing guide: the old prerelease does not necessarily contain the features described here.
As of 29-09-2026 there are two types of package. If whoever passed it to you says it is a signed build ("signed and notarized", DMG whose name ends in -firmada.dmg, for example Talo-beta-candidata28-firmada.dmg): with the signed version just double-click is enough. No manual exception needed; skip directly to step 2. Candidate 28 (30-09-2026) is the first distributed this way to the team: signed with Developer ID, notarized by Apple and stapled, both the app and the .dmg itself. If it is an unsigned build (the usual case until now, DMG with name Talo-*-qa-mac-arm64.dmg or Talo-beta-candidata<N>.dmg without -firmada), the first launch needs the manual exception from macOS described in the section below.
Download and open the application
- Download the Talo installation file (ends in
.dmg) from the private repository, along withSHA256SUMS.txt. If it was passed to you via Slack, AirDrop, or a shared folder, check its hash first: Terminal →shasum -a 256 "path/to/file.dmg"and compare withSHA256SUMS.txt. A different hash means an incomplete download or wrong file. This is the most common reason macOS later says the file "is damaged" when it is not, and why it keeps failing even if you download it several times without checking. - Open it by double-clicking. A window with the Talo icon will open.
- Drag the Talo icon to the Applications folder.
- Open Talo from Applications, like any other app on your Mac. Do not open it directly from the
.dmgwindow: copy it first to Applications and eject the image; otherwise macOS may repeat the block warning each time and some functions (saving preferences, updating) do not behave the same.
If macOS shows a warning on first launch
This section is only for the unsigned build (Talo-*-qa-mac-arm64.dmg). That build has ad hoc signing and is not notarized by Apple. macOS blocks by default any app downloaded from the Internet like this; it is expected, not a failure of your Mac. You will see one of these two warnings, depending on the macOS version and timing:
- "Talo" cannot be opened because Apple cannot check that it does not contain malware. This is the usual warning for an unsigned app.
- "Talo" is damaged and cannot be opened. You must move it to the trash. This is the same Gatekeeper block, but with text that suggests the download failed. It did not, if the SHA-256 from step 1 matched: it is a more aggressive and less clear way of saying "it is not notarized".
Apple explains the warnings and the individual exception.
How to open Talo the first time (macOS 15 Sequoia, 26 and later)
Since macOS 15, right-click → Open no longer offers any way to skip the block: it shows the same warning as double-click, with no "Open" button. The only supported way is:
1. Try opening Talo once (double-click) and let it fail with the warning. 2. Go to System Settings → Privacy and Security, scroll down to the security section and look for the warning about Talo (appears only after trying to open it). Click "Open Anyway". 3. macOS will ask for your password or Touch ID to confirm. After that, open Talo again from Applications: it now starts normally.
If your Mac is managed by your company and that option does not appear, or appears disabled, contact your administrator: it may require an MDM exception.
macOS keeps this exception for the authorized app. A new candidate (a different .dmg, with different content) may require confirmation again.
If you see "is damaged" and System Settings does not offer "Open Anyway"
With the "damaged" warning, some macOS versions do not show any exception in System Settings. Only then, as a last resort (and only if you already checked the SHA-256 from step 1), can you remove quarantine by hand from Terminal:
xattr -dr com.apple.quarantine /Applications/Talo.appWhat this command does and what risk you assume
This command tells macOS "I trust this file, do not check it again when opening": it removes the quarantine mark from Talo.app entirely, including all its internal components. You lose the Gatekeeper protection for that specific .app. Use it only if the .dmg comes from the team's private repository and its SHA-256 matches SHA256SUMS.txt. Never use it as a first step or with a file from a questionable source. No need to repeat it with each new candidate because each DMG is a different file: repeat the hash check each time.
Choose your language
On first launch, Talo detects your Mac's language and starts directly in that language (Spanish if your Mac is in Spanish). If you prefer, you can choose the language yourself on the initial screen or later from Settings; that choice stays fixed even if you change your Mac's language afterward.
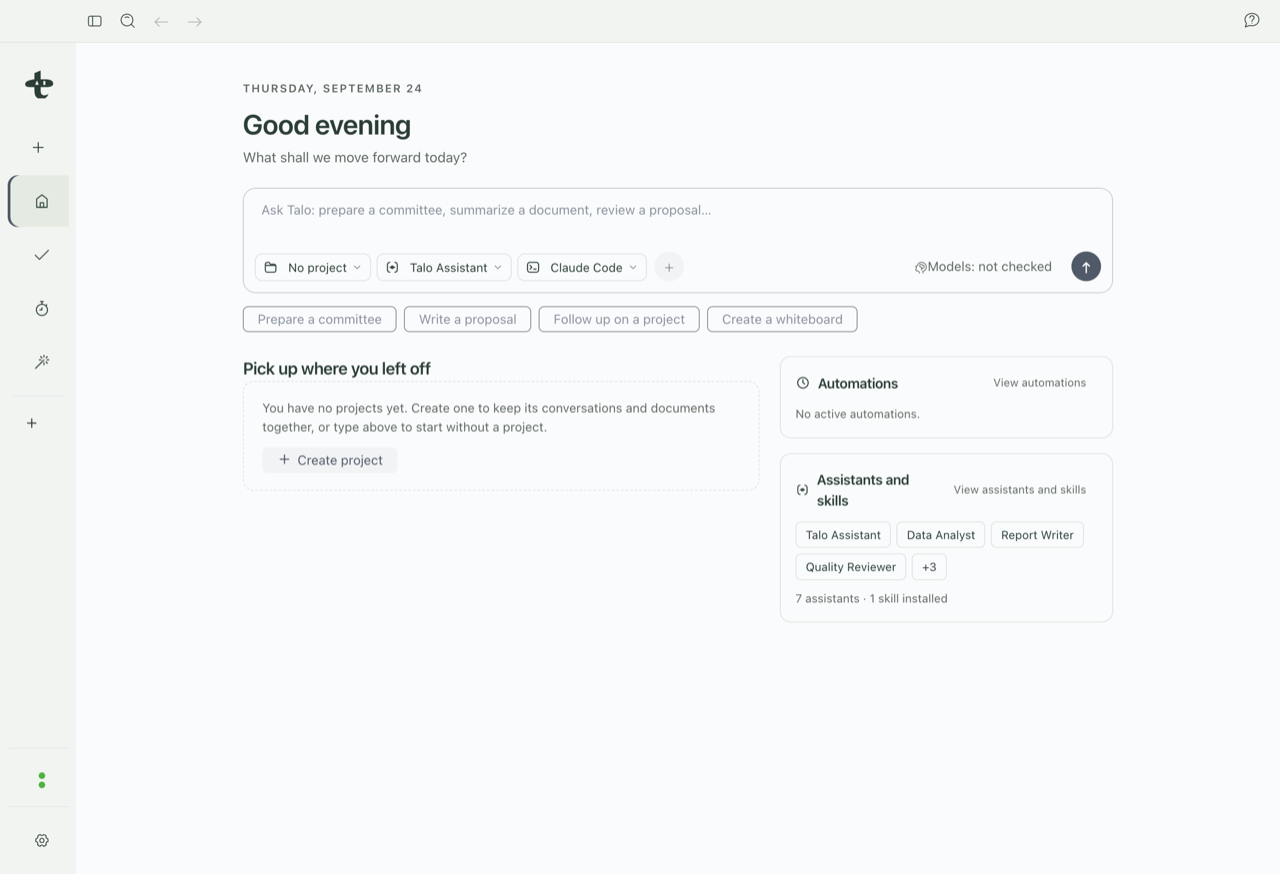
Connect your assistant: Claude Code or Codex
Talo converses through Claude Code or Codex. The application checks if they are already available and offers a guided installation when they are missing. That flow has been tested on a synthetic profile of the package, but still needs to be verified on another Mac with a personal account. You can also install the CLIs through their providers' procedures; Talo does not include their accounts or quota.
Here is the process, step by step: open Settings → Agents and Models. There Talo shows you which assistants are available to install.
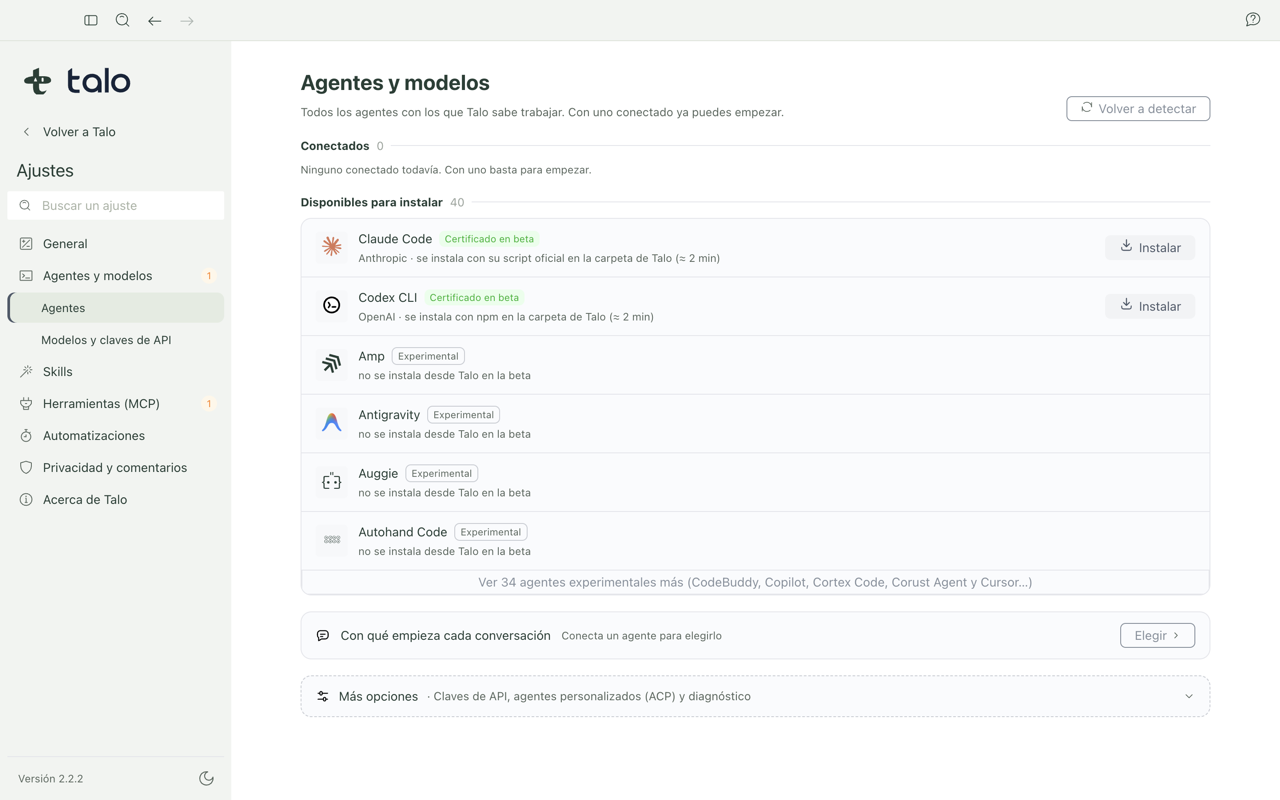
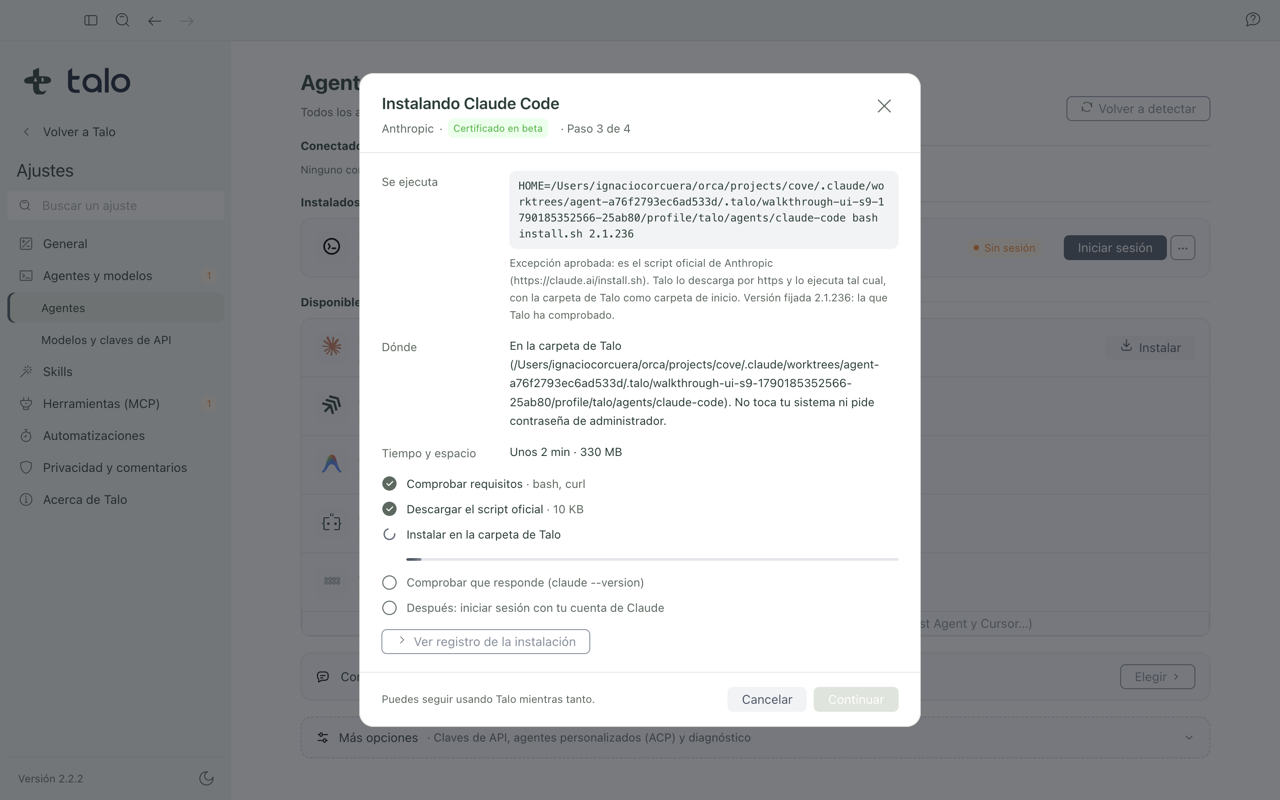
Click "Install" on the assistant you want to use. Talo downloads and installs that assistant within its own folder, without asking for your Mac's administrator password.
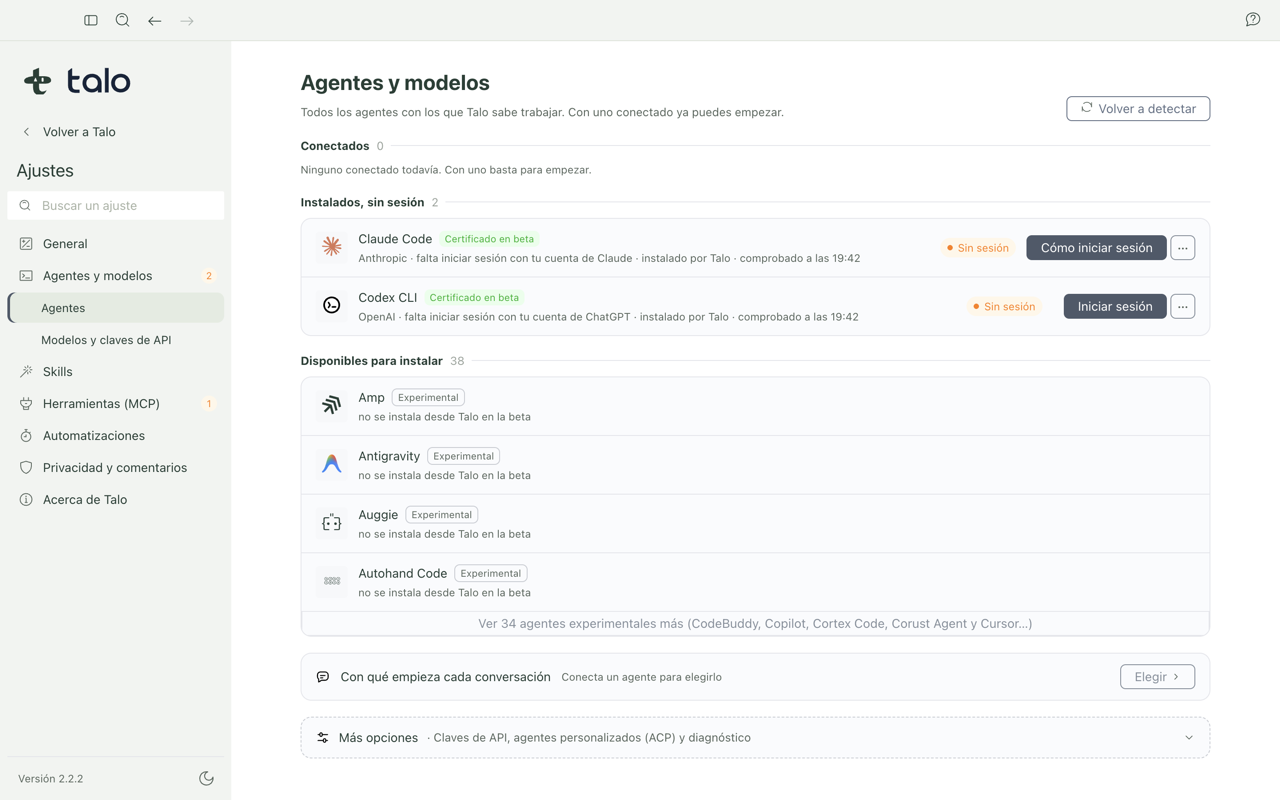
When done, click "Sign In" and follow the on-screen steps to log in with your account. In the case of Claude Code, Talo guides you with clear instructions to complete the sign-in; in the case of Codex, sign-in happens within Talo itself. When the assistant is connected, you will see it like this:
Note
You don't need both assistants to get started. By connecting just one (Claude Code or Codex), you can already create your first project and work in Talo. You can connect the other later, when you need it.
Optional: page-by-page view of Word, Excel, and PowerPoint
Talo opens Word, Excel, and PowerPoint in a reading view: it shows the text, cells, or slide content. "Review with Talo" lets you annotate them in verified package cases; human review with dark theme, keyboard, and Claude Code is still pending.
A second mode, optional, shows the file page by page, as it would print (with its actual layout, not just the text) and adds its own review toolbar (Select, Comment, Highlight, Draw, Circle, Arrow, Text) directly over those pages. This mode does not come inside the Talo installer: it uses a small conversion engine (based on LibreOffice) that is prepared once on your own Mac and runs inside an isolated container, with no Internet access.
Note
This service is not enabled in the beta DMG. Without it, documents still open in reading view. The actual installation and conversion procedure on another Mac still needs QA.
What you need
- Talo installed from the
.dmgon a Mac with Apple Silicon (M1 or later). - Homebrew, to install two free programs: Colima (a small Linux machine for your Mac) and Docker.
- About 2 GB free on disk and Internet connection during setup.
You don't need to download Talo's code or know how to program: it is all done by copying three commands in the Terminal application. Talo shows them to you itself: open any Word, Excel, or PowerPoint file and, in the toolbar at the top of the reading view, click "How to enable it". The window that appears has each command ready to copy and a button to restart Talo.
Steps
- Open Terminal (in Applications → Utilities) and install Colima and Docker:
brew install colima docker- Start Colima:
colima startColima has to be running while you use the page view. If you restart your Mac, run colima start again.
- Prepare the conversion engine with the program that comes inside Talo:
sh /Applications/Talo.app/Contents/Resources/office-worker/install.sh(If you saved Talo in another folder, copy the command from the "How to enable it" window: it already has the right path.) It takes a few minutes the first time. It downloads LibreOffice and two open-source programs, checks the digital fingerprint of each download, and if any does not match, it stops without installing anything. When done it says "Talo: page view ready".
- Restart Talo: close it completely (Talo → Quit) and open it again, or click "Restart Talo" in the "How to enable it" window.
Talo only uses the engine you just prepared, identified by its exact fingerprint, and each document is converted with no network, minimal permissions, and the container is deleted when done. If Talo does not find the engine on startup or Colima is off, it keeps opening documents in reading view, with no waits or errors.
How to check it works
Open a Word, Excel, or PowerPoint file from a project. When it works, the file appears directly as real pages, with the review toolbar (Select, Comment, Highlight, Draw…) at the top.
If instead you see the "Reading View" label, click "How to enable it": the window tells you where you are.
- "The engine is ready. Restart Talo…": step 4 is missing.
- "…Colima is off": run
colima startin Terminal and restart Talo. - "Page view is active, but this file could not be converted": check that Colima is still running and click "Try page view". Some files (with macros, encrypted, with external links, or more than 20 pages) always show in reading view.
How to uninstall it
In Terminal:
sh /Applications/Talo.app/Contents/Resources/office-worker/install.sh removeThis deletes the setup and the conversion engine; when you restart Talo you return to reading view, with no other changes. If you don't use Colima or Docker for anything else, you can remove them too with colima delete and brew uninstall colima docker.
If you're coming from an earlier version
Migrations have been tested with synthetic profiles from earlier candidates, not with all real profiles. If you have work from an earlier version, make a copy before installing the new beta. The change of identifier to com.talo.desktop may make macOS ask for permissions again. If a project or conversation is missing, keep the profile and report it; do not delete it to "fix" the installation.